![]()
Note to users: For additional questions, please refer to the REDCap Help & FAQ tab after logging into REDCap. Within a project the Help & FAQ link can be located in the bottom left menu.
![]()
Creating Forms/Instruments in REDCap:
Should my form be a survey or data collection form?
How can I enable surveys in my project?
What are the available Field Types?
How do I preserve special characters (e.g. Spanish accent marks) in my REDCap project?
Set a Custom record Label
HTML usage in REDCap
Moving to Production:
Why Move to Production?
When should I move from Development to Production?
What are Data Access Groups?
How do I create a set of variables for an unknown number of items?
User Rights:
How do I add Users and Define User Rights?
What are User Roles?
Making Production Changes:
How do I make changes after I have moved my project to Production?
LSUHSC REDCap Hands-On Videos:
Hands-on Session #1 September 15, 2017
Topics covered: SPH Analytic Center at LSUHSC SPH, REDCap Consortium and Vanderbilt University, Basic definitions, how to start a new LSUHSC REDCap project, what LSUHSC REDCap looks like when one logs in and navigates to a project, Importance of Help & FAQ, overview description of Project Home & Project Setup, Left Menu, how to design your instrument, EHR integrations, data importing, adding/editing records, Record Status Dashboard, review a record, how to get more information about LSUHSC REDCap, possible costs, data exports, text-to-speech feature, REDCap login with LSUHSC credentials, data import tool, user permissions, data quality, user whitelist.
Creating Forms/Instruments in REDCap:
Should my form be a survey or data collection form?
One of the most common questions we receive is “What is the difference between a data collection form and a survey?” Below we highlight the differences.
Data Collection Forms:
- Must be filled out by a user who logs into REDCap.
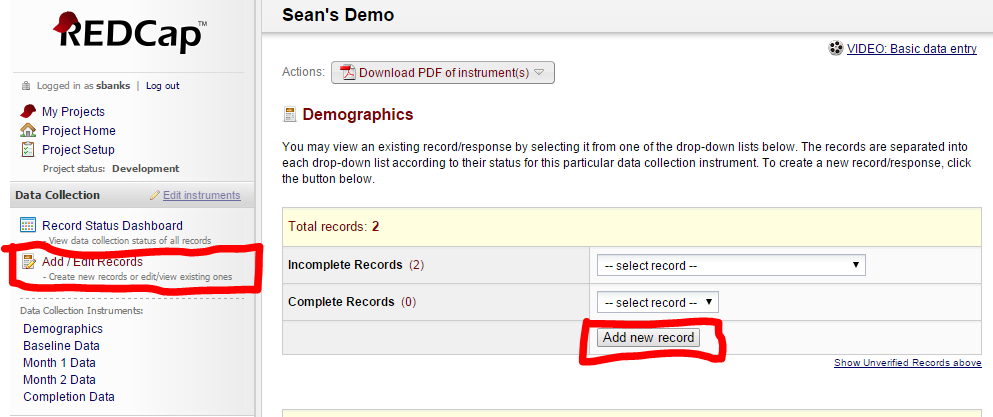
- Request REDCap System Administrators add the users to your project, have the users click on “Add/Edit Records”
- Advantages:
- Users entering data have the ability to see all data they’ve previously entered, edit previous responses, or check for updates.
- Users not only have access to data entry, but all other REDCap features (reports/exports, Training Videos, File Repository, Data Quality checks, etc.).
- Easier to troubleshoot errors because of the log that accompanies data entry.
- All entries are logged with a timestamp. REDCap tracks who entered data, any changes with old and new values, the IP address where it was entered, the date and time, etc. NOTE: This timestamp is not included in reports or exports though.
- User have the ability to give a form a status, marking it as “complete” or “incomplete” depending on what is most useful for workflow.

Surveys:
- Intended to be filled out by participants (non-REDCap users).
- No login required.
- Responses are anonymous unless survey invitations are used and combined with a Participant Identifier (different from marking a field as an identifier in the Online Designer).
- Advantages:
- Survey responses are anonymous (can also be a disadvantage).
- All completed surveys have a date and timestamp that can be included in reports and exports.
- Easier to enter responses from a smartphone or tablet.
- No need for logging in or adding users.
How can I enable surveys in my project?
Adding and enabling surveys in your project can be accomplished in just a few clicks. Here’s how:
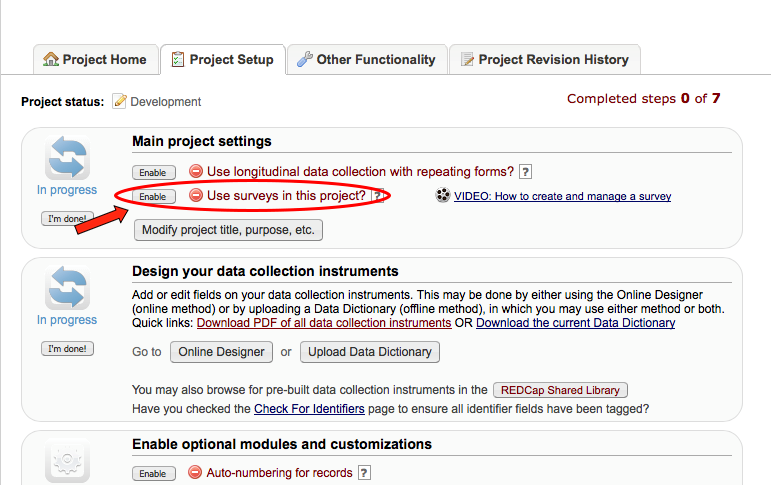
1. In Main project settings, select Enable button next to Use surveys in this project?
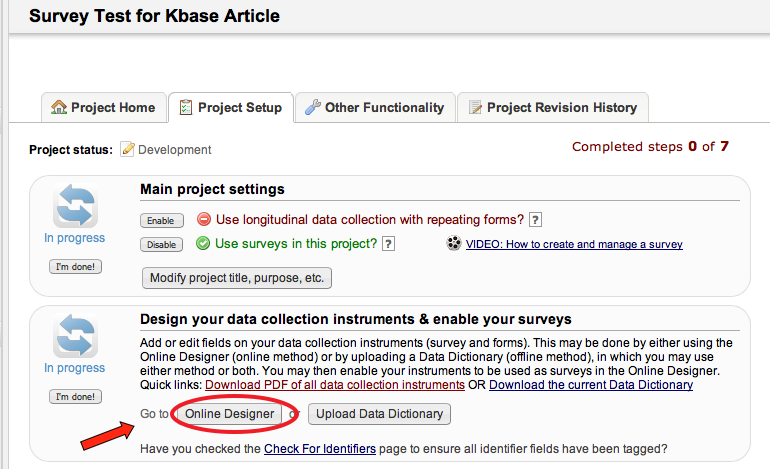
2. In Project Setup, select Online Designer:
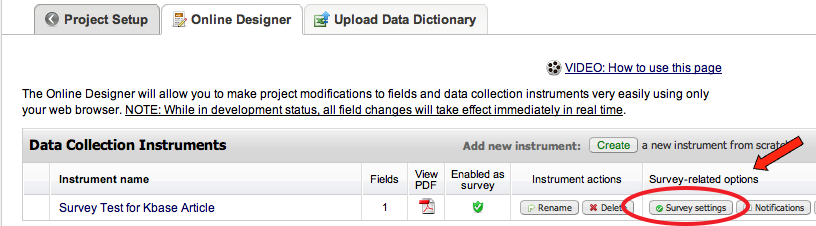
3. In Online Designer, select Survey Settings:
What are the available Field Types?
A field is defined by the following attributes: type, label, name, validation, required, identifier, note.
Available field types:
- Text Box: single-line text box (for text and numbers)
- Notes Box: large text box for lots of text
- Calculated Field: perform real-time calculations
- Multiple Choice – Drop-down List: options for single answer
- Multiple Choice – Radio Buttons: options for single answer
- Checkboxes: checkboxes to allow selection of more than one option
- Yes – No: radio buttons with yes and no options; coded as 1, yes | 0, No
- True – False: radio buttons with true and false options; coded as 1, True | 0, false
- Slider/Visual Analog Scale: coded as 0-100
- File Upload: upload a document
- Descriptive Text (with optional image/file attachment): optional formatting feature
- Begin New Section (with optional text): starts new page
In addition, branching logic can be applied to specify whether or not a question will be displayed, depending on values entered in previous question(s).
How do I preserve special characters (e.g. Spanish accent marks) in my REDCap project?
To retain all the special characters in your REDCap project:
When you download a data dictionary file from REDCap, it comes out encoded as UTF-8, which is correct if you want the special characters to display correctly. As soon as you open it in Excel and save it, Excel automatically changes the encoding back to ANSI. When you upload that dictionary back into REDCap you see jumbled characters.
There are two solutions to this problem:
Downloading this addin to Excel:
http://jaimonmathew.wordpress.com/2011/08/23/excel_addin_to_work_with_unicode_csv/
When saving a data dictionary with special characters, just click the “Unicode CSV” tab and click Save, instead of saving it regularly. Upload this saved dictionary to REDCap.
Alternatively, you can save the data dictionary in Excel, then open it in Notepad or Notepad++, and then click save as to change the encoding to UTF-8.
When choosing to review an existing record (regardless of whether it was entered as a survey response or data entry form), we always recommend adding a custom record label.
This first example shows a list of records with no custom record label.

This example includes a custom record label. Notice how it does not simply provide the ID, but also shows name and date of birth.
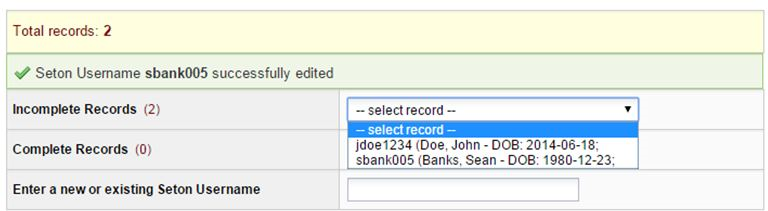
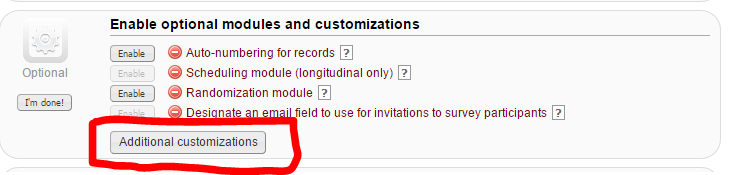
To add a custom record label, click on “Project Setup” then additional customizations (first option). In the example above, the custom record label is: ([last_name], [first_name] – DOB: [dob]; In this example, variable names are in brackets and all other text will appear as is.
Using HTML tags within field labels or field notes provides a useful way to customize your REDCap project. For examples of how to use HTML within your projects, please visit this Example Survey in REDCap. At the end of the survey, there is a data dictionary that you can download which shows you all of the coding used for the HTML. Below are screenshots of some of the things you can do using HTML.
 b. Font color and backgrounds:
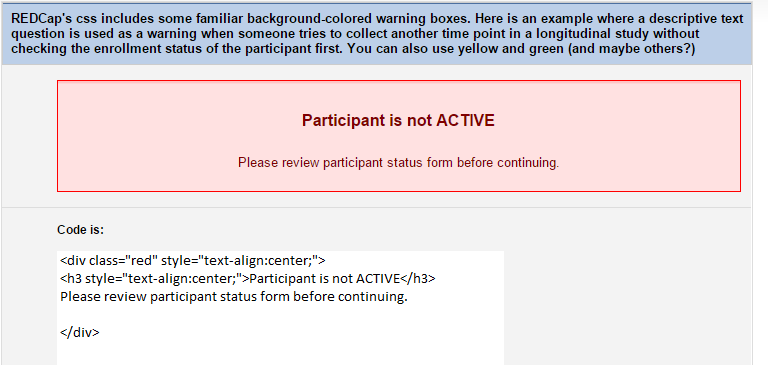 c. Adding hyperlinks:
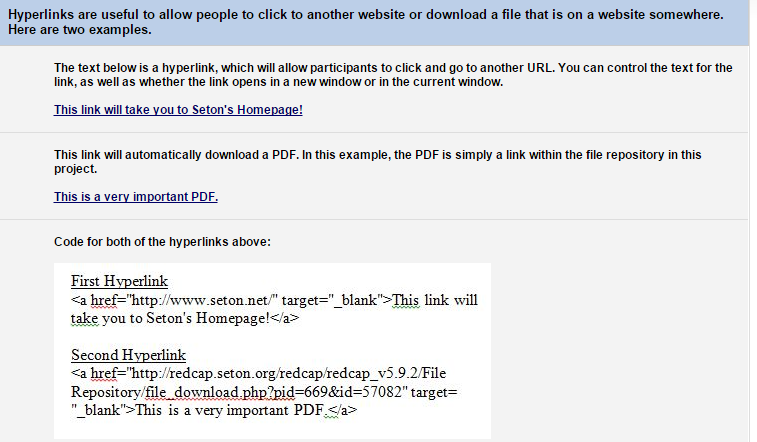
Moving to Production:
Production mode is designed to protect your data from unintentional data corruption or deletions which could wreak havoc on your carefully planned and constructed project. It does not unlock any additional features for the end-user and is only there is a safety measure to protect your data from your own mistakes. When you are in production mode, each version of your data dictionary is kept and can be reverted to in the event of a mistake or to see when changes were made to a project. This is great when an accident, such as uploading a partial data dictionary occurs.
When you start a new project in REDCap, it is in development mode. Here you can easily create new forms, delete forms, change fields, and more. While this flexibility is great for designing and testing your project, it could easily cause problems once you’re ready to collect your real study information. When you are in production mode, any change to the data dictionary that could result in the loss of data will require approval (which can mean a 24 hour delay).
When should I move from Development to Production?
If the thought of losing the data you have entered into your REDCap project sounds painful, then you should be in Production mode. Production mode helps protect your data from accidental mistakes.
In general, we recommend you enter at least 5 test records in development mode, verifying ALL branching logic, survey flow, etc. If testing went really well and you have a bunch of good data in your project, you can move to production mode and KEEP existing data (uncheck the box to KEEP). In most cases, however, you will delete all your test data and start from scratch once in production mode.
Data Access Groups restrict viewing of data within a database. A typical use of Data Access Groups is a multi-site study where users at each site should only be able to view data from their site but not any other sites. Users at each site are assigned to a group, and will only be able to view data entered by users from that group.
How do I create a set of variables for an unknown number of items?
For a question with an unknown number of answers, such as how many medications someone is taking, you may want to display the fields only as they are needed. REDCap currently is not able to dynamically produce these fields, however, there is a way to use branching logic to do this.
If you can estimate what the maximum number of fields you will need, create that many copies of your field, and hide/expose them as needed using branching logic. So, for example, if you think 15 is a good maximum, you would create 15 copies of the field. Then you could create a count variable that these fields would branch off of.
Your branching logic would look like this:
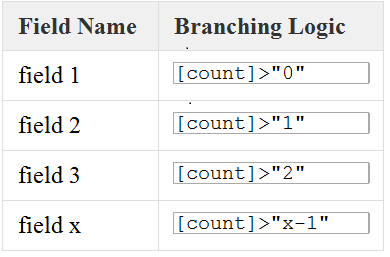
So, if your variable is medications, and the respondent takes 2 medications, you enter 2 in count variable, then the med1 and med2 fields appear, if they take 3, you enter that, and meds1 to med3 fields appear. Another method is to first create the maximum number of fields that you estimate will be needed, as above, and the hide/expose each field as the previous field receives data. Using this method will cause each field to show up as needed.
Your branching logic would look like:
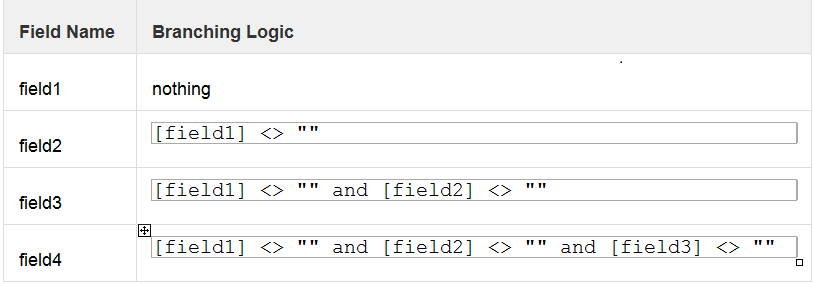
A note of caution: In both of the above examples it is possible for one to enter data into one of the fields but for that field to later not be displayed to the user. This is a general issue whenever using branching/skip logic.
User Rights:
How do I add Users and Define User Rights?
LSU Health New Orleans users are automatically added to the REDCap system with the same credentials. Project Owners are responsible for adding users to the individual project and assigning the appropriate rights within the User Rights module of the project. Please contact redcap@lsuhsc.edu if you need to add individuals that are external to the LSU Health New Orleans system.
User Roles (e.g. data entry personnel) are useful for your project when you have several users who will require the same User privileges. Instead creating privileges individually, you can add a role and assign users to that role. Roles allow you to easily add many users to a role in a much faster manner than setting their user privileges individually. Roles are also a nice way to categorize users within a project. Any user assigned to a role will assume the user privileges of that role. Users can be assigned, reassigned, or unassigned to roles at any time. There is no limit to how many roles that can be created per project nor a limit on how many users can be assigned to a given role.
Making Production Changes:
How do I make changes after I have moved my project to Production?
To make changes after you have moved your project to Production, first download the current Data Dictionary so that you can revert to the current version, if necessary, if something goes wrong with making changes. Then, select “Enter Draft Mode” on the Online Designer or Data Dictionary page. After making your changes, you can review them by clicking on “view a detailed summary of all drafted changes” hyperlink at the top of the page.
REDCap will flag any changes that may negatively impact your data with the following critical warnings in red:
*Possible label mismatch
*Possible data loss
*Data WILL be lost
After making and reviewing changes, you can click “Submit Changes for Review.” The REDCap Administrator will review your changes to make sure there is nothing that could negatively impact data you’ve already collected.
Certain changes will be automatically approved. These include if the project has no records OR if only new fields are being added (i.e. no existing fields were modified). Otherwise, if anything is questionable or flagged as critical, you may receive an email from the Administrator with this information to confirm that you really want to make the change.
Certain changes to the structure of the database, such as designating instruments to events or modifying events in a longitudinal project can only be done by the REDCap Administrator.